Saturday, June 5, 2010

Projects Idea's For Networking Students


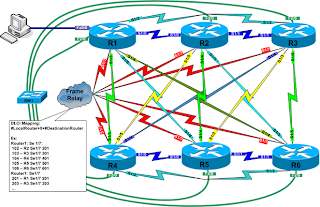
An Approach for Designing And Securing The Large Network


For all the University students who belong to the Department of computer Sciences, If they are designing the Projects for their courses which is related to Networking Can contact me .


Projects will be an example of Real Time Scenarios

CATEGORIES:


1) AAA ( Authentication, Authorization , Accounting)
2) Tacas +
3) Radius
4) Inter VLAN routing
5) Access, Distribution And Core Layer Deployment
6) Routing Protocols
7) Redistribution
8) Redundancy
9) Remote Connectivity Using Secure Shell
10) Less cost Effective Deployment 
11) High Cost Effective Deployment
12) VPN
13) VOIP Connectivity
14) Wan Connectivity using FRAME RELAY, PPP, HDLC ,ATM

PlatForm: Windows Xp , Windows 2007, Windows Vista

Technologies: 

  • Packet Tracer 5.3 
  • GNS 3 
  • BOSON Netsim
  • LabSim
Any Student Who is interested for designing And understanding the project  Can contact me 

E mail : Ubaidalijaffery@hotmail.com


Saturday, May 1, 2010

Configuration Of Routing Protocols

How to Configure RIP

staticroutes.gif


Before you start, make sure you clear both routers' configuration using the 
Router#erase startup-configcommand. First we will configure RouterA, after the router reboots, the following message will be displayed: 

% Please answer 'yes' or 'no'.
Would you like to enter the initial configuration dialog? [yes/no]


Type 
no and press ENTER. Press ENTER again when the message Press RETURN to get started appears. Typeenable at the Router> command prompt to enter Privileged Exec mode, notice the prompt chances to Router#.


CONFIGURING THE FIRST ROUTER

STEP 1. Change the router's host name to RouterA

Enter configuration mode using the following command:
Router#configure terminal 

Change the host name of the router to RouterA using the following command :
Router(config)#hostname RouterA
RouterA(config)#

Notice how changing the hostname immediately affects the prompt. Remember that you are configuring the 
runningconfiguration.


STEP 2. Disable domain lookups

To prevent the router from interpreting every incorrectly typed command as a host name and trying to resolve it to an IP address to setup a telnet connection with it, use the following command:
RouterA(config)#no ip domain-lookup


STEP 3. Configure passwords 

First set the enable password to 
cisco123 using the following command:
RouterA(config)#enable secret cisco123

Next, set the password for telnet connections to 
cisco456 using the following commands:
RouterA(config)#line vty 0 4
RouterA(config-line)#password cisco456
RouterA(config-line)#login


Although the 
enable secret command is used to encrypt the enable password, other passwords stored in the router's configuration should be encrypted as well. To do this, use the following command:
RouterA(config)#service password-encryption


STEP 4. Configuring the Ethernet interface

Enter Interface configuration mode for the Ethernet interface, using the following command:
RouterA(config)#interface Ethernet 0

Give it the description "Connected to LAN" using the following command:
RouterA(config-if)#description Connected to LAN1

Configure the IP address (see diagram for correct address) for the interface using the following command:
RouterA(config-if)#ip address 192.168.11.1 255.255.255.0

Enable the interface using the following command:
RouterA(config-if)#no shutdown


STEP 5. Configure the serial WAN interface

Switch to Interface configuration mode for the first Serial interface, using the following command:
RouterA(config)#interface Serial 0

Give it the description "Direct connection to RouterB" using the following command:
RouterA(config-if)#description connected to RouterB

Configure the IP address (see diagram for correct address) for the interface using the following command:
RouterA(config-if)#ip address 192.168.22.5 255.255.255.0

Configure the interface to use PPP encapsulation using the following command:
RouterA(config-if)#encapsulation ppp

Enable the interface using the following command:
RouterA(config-if)#no shutdown


STEP 6. Configure RIP

Use the following command to enable RIP on RouterA: 
RouterA(config)#router rip

Configure the router to receive and send only RIP Version 2 packets using the following command:
RouterA(config-router)#version 2

Use the following commands to specify the networks directly connected to the router:
RouterA(config-router)#network 192.168.11.0
RouterA(config-router)#network 192.168.22.0 


STEP 7. Save configuration

To copy the currently running active configuration to NVRAM, so it will be used the next time you reload the router, use the following command:
RouterA#copy running-config startup-config


STEP 8. Configuration second router


To configure the other router, RouterB, repeat the steps above. Use the network diagram to determine the correct addressing and names. To enable the back-to-back serial connection between te routers, you need to configure one router as DCE using the following command in Interface configuration mode for the serial connection on RouterB:
RouterB(config-if)#clock rate 64000


STEP 9. Verify and test the configuration

Verify using the ping command Host A to Host B, make sure you configured both hosts to use the nearest router's interface as the default gateway in the TCP/IP settings.

On both routers, run the following command in Privileged Exec mode to determine which device is the DCE:
Router#show controllers s0

On one of the routers, run the following command in Privileged Exec mode to display the parameters and current state of the active routing protocol process, and examine the output:
Router#show ip protocols

Use the following command to verify routing table entries on both routers:
Router#show ip route

Use the following command to list a summary of the interface's IP information and status on both routers, and examine the output:
Router#show ip interface

Use the same command with the 
brief option, and the notice output:
Router#show ip interface brief

VLSM & CIDR ((( SECRETS)))


CIDR: Classless Inter-Domain Routing (CIDR), which used Variable Length Subnet Masking (VLSM) to help conserve address space.

CIDR ignores the limitation of classful boundaries, and allows summarization with masks that are less than that of the default classful mask.

CIDR uses Variable Length Subnet Masks (VLSM) to allocate IP addresses to subnets according to individual need rather than by class.

CIDR is also use to minimize the entries in a routing table.

One of the goal of classless inter domain routing is "to provide a mechanism for the aggregation of routing information.


VLSM: VLSM is simply subnetting a subnet. Subnets can be further subnetted in multiple levels,

VLSM conserves address space

Ability to specify a different mask  for the same network number and different subnets.


Example of Classful Routing Updates


Using classful IP addresses meant that the subnet mask of a network address could be determined by the value of the first octet, or more accurately, the first three bits of the address.

Classful routing protocols cannot send supernet routes because the receiving router will apply the default classful to the network address in the routing update.


Example of Classless Routing Updates


More efficient use of IPv4 address space

Prefix aggregation, which reduced the size of routing tables.

Classless routing protocols include the subnet mask with the network address in the routing update.

Classless routing protocols are necessary when the mask cannot be assumed or determined by the value of the first octet.

Classful routing protocols can only summarize routes to the default classful mask.


Route Summarization


Also known as Supernetting

Used to reduce the number of entries in a routing table.

Combining several IP addresses in one IP address.


Super Net:

A supernet is a block of contiguous classful networks that is addressed as a single network.

Friday, April 30, 2010

Network Protocols

Protocols can be classified as :
1) Routed Protocols
2) Routing Protocols
3) Non Routable Protocols

ROUTED PROTOCOLS

ROUTED PROTOCOLS are nothing more than data being transported across the networks. Routed protocols include:

  • Internet Protocol
    • Telnet
    • Remote Procedure Call (RPC)
    • SNMP
    • SMTP
  • Novell IPX
  • Open Standards Institute networking protocol
  • DECnet
  • Appletalk
  • Banyan Vines
  • Xerox Network System (XNS)

ROUTING PROTOCOLS

ROUTING PROTOCOLS are the software that allow routers to dynamically advertise and learn routes, determine which routes are available and which are the most efficient routes to a destination. Routingprotocols used by the Internet Protocol suite include:

NON-ROUTABLE PROTOCOLS

NON-ROUTABLE PROTOCOLS cannot survive being routed. Non-routable protocols presume that all computers they will ever communicate with are on the same network (to get them working in a routed environment, you must bridge the networks). Todays modern networks are not very tolerant of protocols that do not understand the concept of a multi-segment network and most of these protocols are dying or falling out of use.
  • NetBEUI
  • DLC
  • LAT
  • DRP
  • MOP